I have just installed SVN at home under Windows 7 and thought I would share the steps I did.
In case you see "SVN" first time. This is shortcut for a file version control system. Its full name is Subversion. It seems to be prefered today over CVS system, which was used earlier.
I already used Eclipse for coding python modules, but I wanted to:
a) keep version history just in case b) get to know more about using SVN
Eclipse has CVS system built in, but as I use SVN at work, I wanted to learn the same at home.
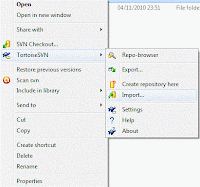
First thing was to create SVN repository. As I wanted an easy way, I`ve downloaded Tortoise SVN which is Windows shell extension. So it does the same as typing in shell, but using Windows Explorer UI (right click menu on folder has Tortoise sub-menu):
After installation you just need to make a directory which will be your Repository. I created a folder C:/SVNRepos. Then use Tortoise menu option Create repository here. That`s it. You shouldn`t change or delete files in this folder. The repository system is using it.
Next step is adding files to repository. These can be anywhere and they can even be later deleted. Usually it`s a folder containing some subfolders and script files. If you want the top folder to appear in repository, you have to actually go one folder up and add this. In case there are more folders under top folder, just copy it as I did, so there is nothing else.
So I right-clicked for Tortoise menu on a folder "svn" containing my main tool folder and choosed Import...
(click on image to see full size)
Then all folders and files were recursively added to my new SVN repository. Now about Eclipse...
Eclipse doesn`t have SVN built-in, so you need to download it as a plugin, which is easy. Go to Help>Install New Software. Then add this path to Work With texfield:
http://subclipse.tigris.org/update_1.6.x
Make sure that this points to latest Subclipse version. Better go to main Subclibse website and check what is latest to get all the new features. It can actually happen if you install old version, that it will not be able to recognise the SVN repository system, which can be newer version. This is why latest is important.
Then just click all plugin parts and follow easy installation steps. At one point you will be prompted to agree with Subclipse terms of use and also that you want to use a sofware without Windows signature. This is only formality.
Now just go to File>New>Project>SVN>Check Out Project From SVN, choose Create New Repository and type your svn repository path, for example
file:///C:/SVNRepos/
In the last options you can choose Eclipse to check out the files into its default folder. I prefer my own location, which is not under Eclipse folder, as I can better integrate it to my tool folders.
(click on image to see full size)
If this all worked you can now enjoy Eclipse with SVN controlling your development files :)


